Whenever you are creating a list of constituents, you should start with the Advanced Query Wizard—even if your ultimate goal is to create letters in the Word Processor. Starting with the Advanced Query Wizard will allow you to save your query criteria so that you can use it again in the future.
For an overview of the Advanced Query Wizard and its controls, see Advanced Query Wizard Overview.
- From the main menu, choose Reports > Queries > Advanced Query Wizard. The Advanced Query Wizard launches.
- Click the Create New Query button at the top of the Query Wizard window. This opens a new browser tab for your new query.
Note: If you have saved a query that would work as is or with a little modification, select your Saved Queries tab, find your old query, and make necessary modifications, and then run the query. - Choose the Query Type that you want to query on. For a mailing list, you would probably choose Constituent or Donation, depending on how you plan to filter the data. In the example that follows, the criteria will be based on prior giving history, so it makes sense to choose Donation as the query type in this situation. If it were based on group memberships or constituent notes, choosing Constituent would be more appropriate.
Note: If you are unsure about which query type to use, you can always select one and select Next to see which fields are available. If it is not what you were looking for, select the Back button and pick a different query type. - In the Purpose of Query frame at the bottom of the window, click Mail Merge or Mailing Labels, and then click Next.
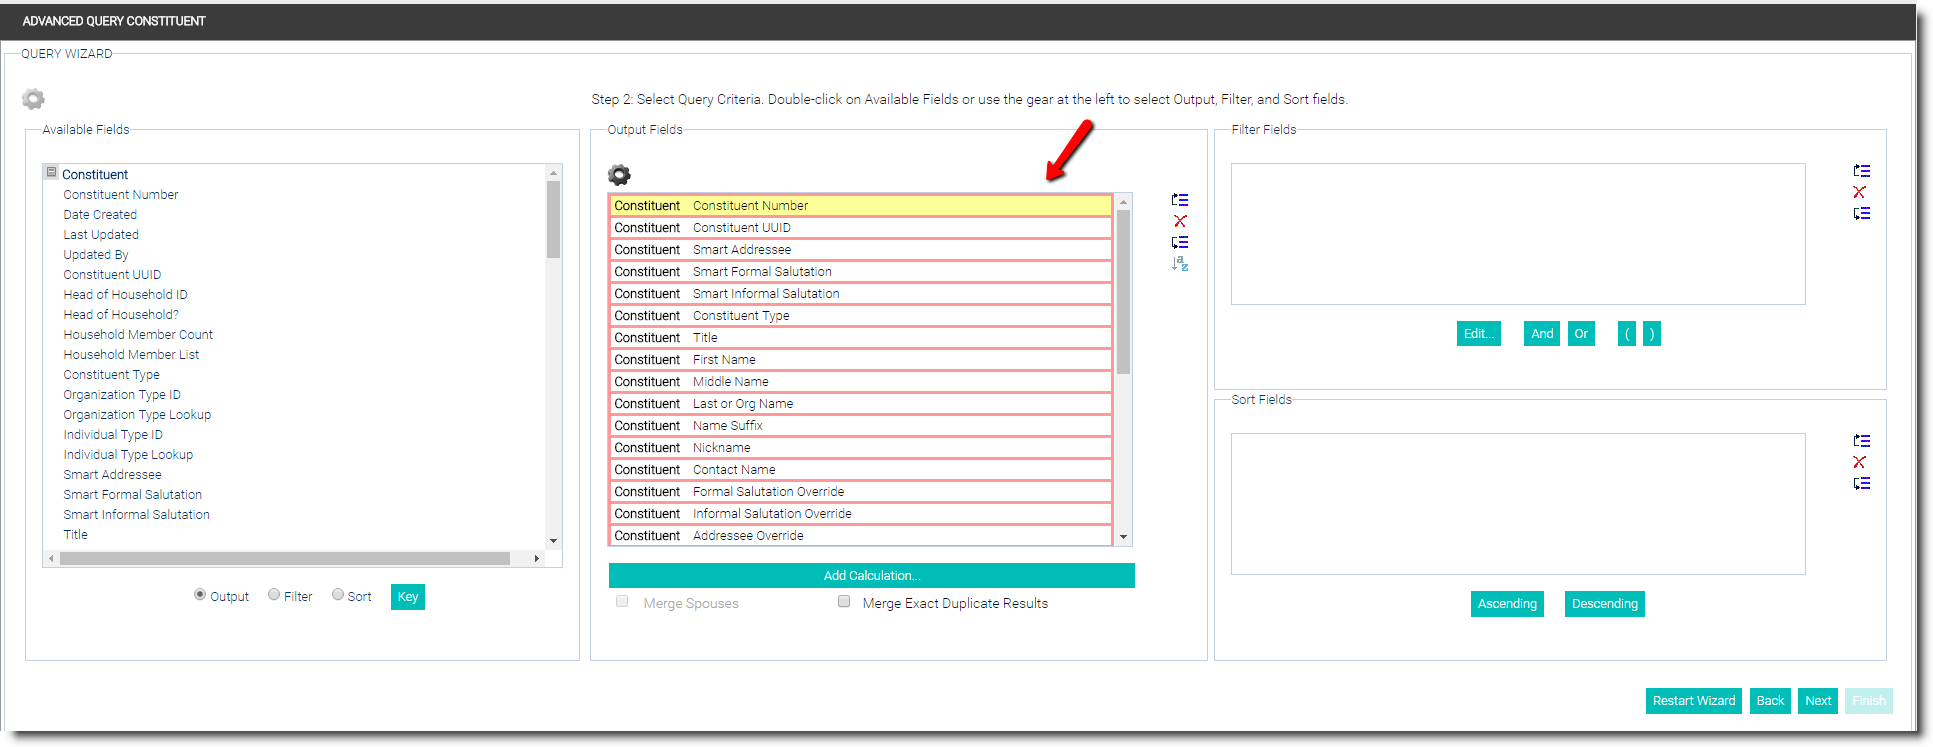
- Because you selected Mail Merge or Mailing Labels, the Output Fields section will contain some basic Constituent information, including name and address information, outlined in red. Remember that any fields that you want to have available for your letter should be in the output fields. It is better to include more fields than you think you’ll need.
Note: Required fields are outlined in red by Salsa CRM.
Note: The label printing feature in Salsa CRM is configured to recognize only name and address information on the labels. Custom fields are not recognized in the label format and will not appear on your labels. For example, if you have entered a Company Name on an Individual record, the company name would have to be entered in an Address Line on the record for it to appear on the label. If the Company Name is entered in a custom field it will not appear on the label. - If you would like the Salutation Override information returned in the ‘Smart’ salutation variables, you must include that information in your query output. Your choices, found under the Constituent section of the Available Fields panel, are: Formal Salutation Override, Informal Salutation Override, Addressee Override, List As Name Override, Spouse Formal Salutation Override, Spouse Informal Salutation Override, Spouse Addressee Override and Spouse List As Name Override. If all required fields for Smart Addressee or Smart Address are not present, your letter salutation, envelope, or label may be wrong.
- Filter your data either by right-clicking the field and selecting Filter from the drop-down list, or by selecting Filter under the list of fields and then double-clicking fields on which you want to filter. Always include the following data filters when generating a mailing list:
- Preferred Contact Reason – remove anyone that does not want to receive mail or who has a bad address
- Preferred Contact Method – remove anyone that does not want to receive mail
- Deceased Date is blank
Note: For Preferred Contact Reason and Method, there may be more than one field that you want to either include or exclude. Use the “is one of” or the “is not one of” operators to choose more than one. If you are using a Donation query, you will find constituent information, such as deceased date and contact reason, under the Donor menu. - Donor Addresses Primary? equals YES
- Donor Addresses Line 1 is not blank
- Donor Addresses Reason ID is one that allows mail
- Donor Addresses State is not blank
- Donor Addresses State does not equal "N/A"
- Last Gift Date is within a given range (operator = is between)
- Last Gift Amount is over a certain amount (operator = is greater than or equal to)
- Select Merge Spouses and Merge Exact Duplicate Results checkboxes (at the bottom of the Output Fields Frame) to ensure only one mail item per household is generated (Merge Spouses does not activate until Spouse Constituent Number is added to your Output fields - Spouse Title, First Name, and Last Name are also required to add both names to Smart Addressee).
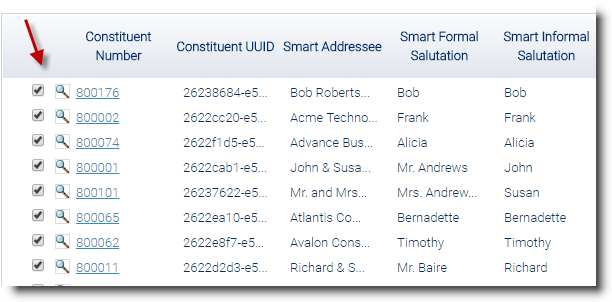
- Click Next once you have added all the filters and output fields that you need. On the Step 3 screen, you will see the results of your query. To see any line in more detail, select the magnifying glass. To deselect a certain record that you do not wish to be in your mailing list, uncheck the box on the left-hand side of that line.

- Click Next once you are satisfied with your results. The Post Query Options window will open. If the results make you realize that you need to change your criteria, select Back to fix the query.
- Click Save, and then click Save Query Criteria... This saves your query to Salsa CRM so that it can be used again in the future. Click Save Locally... (just to your computer) and save the results as a .csv file for a reference. You should also save it to the server so it is available to everyone in your organization.
- After you've saved your query, click OK. The Post-Query Options window reappears.
- If you wish to create mailing labels or envelopes, select the Print Labels... button. The Label Printing screen will open. The default font, SansSerif, is selected. If you wish to change the font, de-select the Use Default checkbox. The Font screen will appear.
Note: Salsa CRM utilizes smart font technology, which means that if you select a font style or size that is too large for the label selected, Salsa CRM will reduce the size of the font for individual labels to ensure that the full name and address of the recipient is printed. - Select the font Name, Size, Style, and Color, and then click OK. The Label Printing screen will open.
- Select the desired label stock. Check the Include Barcode option if desired. If an envelope stock was selected, check the Include Return Address option if desired.
Note: A Return Address dialog box will open. Enter the desired return address, and then click OK. - The margins are pre-set according to the stock selected. The margins can be manually adjusted if needed. In the Set Margin frame, enter the desired measurement.
- If you want to start the label printing on a label other than the first label on the sheet, edit the number in the Start At box.

- Check the Center Text box if you would like to center your text on the labels.
- Click Format Labels.
- Now that your mailing list is compiled and saved, you can create your letter.