Click the header to expand the content that you'd like to see.
Step 1: Getting Started
- Click Activities from the left navigation menu.
- Select the Peer-to-Peer tab.
- Click the + Create a Peer-to-Peer Event button to the right of the window.
- The Make Your Selection tab is selected by default. For simple directions on how to Make Your Selection, go to the Make Your Selection topic. When you're done, you can come back to this page to complete the P2P process.
- Click Next to go to the Basics tab.
- Fill out the following fields (required fields are denoted in the application with a *):
- Reference Name—The internal name for your Event. This name will be used internally only.
- Add a Description—Enables you to provide information for future reference. Internal use only.
- Publicly visible name for the event—The public-facing name for your Event
- Start Date, Start Time, End Date, End Time, All Day —Logistical information about your event. This can be completed later.
- Time Zone—The time zone of your event.
- Mailing Address for Offline Donations given to Participant Fundraisers —This field contains the address that will be included on the deposit slip that fundraisers can print for off-line donations. It is pre-populated with the address that was configured when you set-up Salsa Engage. You can change this address in-line for a particular P2P activity, or change it for all new activities at Settings > Organization's Profile.
- Is this event online-only?—'No' is selected by default. If you select 'Yes', the Event Location fields will disappear.
- Name of Venue—The name of the location where your event will take place.
- Street Address—The street address of the location where your event will take place.
- City, State, Zip code - The city, state, and zip code in which your event will take place.
- Will this event allow teams?—'Teams' enables groups of supporters to work together toward a common fundraising goal. 'Yes' is selected by default. This enables the Team Page later in the workflow. For more information, see the 'Compose the Team Page' section below. If you select 'No', you will not see the Team Page later in the workflow.
- Will this event have an event-level fundraising goal in addition to fundraiser/team goals? —This control enables goal tracking and sets parameters for the Goal Tracker Element in the Visual Editor. You can set this to track goals in Salsa Engage reporting. In addition, you can place a Goal Tracker Element on your Event, Fundraiser, and Team pages. If you do not select 'Yes' and enter an Event goal amount, Salsa Engage will not keep track of fundraising progress relative to a goal, and the Goal Tracker Element will not work (even if it is included on a page).
- In addition to donations, totals toward my goal should include funds from Registrations/Purchases—Check the Registrations box or Purchases box or both if you want funds collected from registrations and products to go toward your goal.
- Would you like to set default fundraiser goals?—Select Yes if you want goal amounts for fundraisers and teams to be pre-populated with a default, suggested value.
- Will you require fundraisers to sign a waiver?—No is selected by default. Select Yes if you want to enter waiver text to which fundraisers will have to agree.
- Fund, Campaign, Appeal—You'll see this field only if Engage is integrated with Salsa CRM. Set the Fund, Campaign, and Appeal that will be assigned to donations processed. 'Fund' is required. Campaign and Appeal are optional. You can add additional values through Salsa CRM. In Salsa CRM main menu, navigate to Manage > Finances. Check out the Salsa CRM documentation for detailed directions.
- Click the Next: Registration Levels button to the bottom-right of the window. The Registration window appears.
Step 2: Registrations
After you complete the Setup tab, you'll land on the Registrations tab. There are three tabs on this page that you'll need to complete: (A) Registration Information, (B) Information Collected, and (C) Optional Purchases. These are documented below.
(A) Registration Information
Do You Want to Raise Funds?
- Before you start, be familiar with Registration types detailed in the Common types of Registrations section above.
- Salsa Engage P2P supports the following ticket configurations:
- Fundraiser—An event participant who is fundraising on behalf of the organization. This ticket type enables the supporter to create a personal fundraising page. You'll create a template for this page in Step 4: Compose the Fundraiser Page, below.
- Non-Fundraiser—An event participant who is attending the event but is not fundraising. This could be an individually purchased ticket or the guest of a Fundraiser.
NOTE: Your supporters cannot switch between these options. Campaign Managers (not the supporter) would have to...- Cancel the P2P registration.
- Re-register as a complementary offline registration with the opposite fundraising selection.
- Non-Fundraiser registrations do not require an email address for each ticket. For example, children who are attending with a guardian should not need an email address to obtain a ticket to an event. Only the purchaser or primary registrant must provide an email address.
- If your P2P Event is only online (with no physical event) and has no cost or Registration Levels associated with it, you can configure Salsa Engage so that fundraisers will not see a Registration Level selection step when registering for your event. For free online-only events, set Is this event online-only? to 'Yes', and create only one registration level that is free. If there is more than one registration level, the fundraiser registration workflow will include a Select a registration level step before taking the fundraiser to the page for creating a personal fundraiser page.
The information collected here includes Registration Name, Description, Price, Availability, etc. One feature unique to P2P Events (as opposed to Engage's standard Events) is the ability to require the registrant to create a personal fundraising page. For detailed information about fields on this page, click the help icon ![]() next to the field that you are interested in.
next to the field that you are interested in.
For individual registrants who should not have a personal fundraising page, select No for This registration level includes a personal fundraising page. This would include non-fundraiser tickets and guest tickets.
If you want the registrant to have a personal fundraising page, select Yes for This registration level includes a personal fundraising page. This will also activate Registration cost counts towards the fundraising goal ; Select Yes if you want registration costs counted toward the fundraising goal for the given registration level.
Supporters who purchase fundraiser tickets will be prompted to create an account when they purchase their ticket. This account will be used to create and manage their personal fundraising page.
Click Save after you've completed the page. The Information Collected page will be given focus.
(B) Information Collected
This tab enables you to define what information will be required of your supporters when they purchase tickets. For detailed information about fields on this page, click the help icon ![]() next to the field you are interested in.
next to the field you are interested in.
- By default, First & Last Name and Email Address are enabled. Click on the slider to disable the default settings or enable additional settings.
- Salsa Engage enables you to create three value-types for custom questions: Yes/No, Single Choice, and Text Field. You may then apply custom questions to a particular ticket type and/or restrict the questions to just the person purchasing or the individual registrants themselves. Click the + Create a Question button to the right of the screen to open question options.
- Enter a question, a response type, and to which tickets you want to the question to apply.
- After applying custom questions to Tickets, click the Save button; Then click the Continue button. The Optional Purchases tab will be given focus.
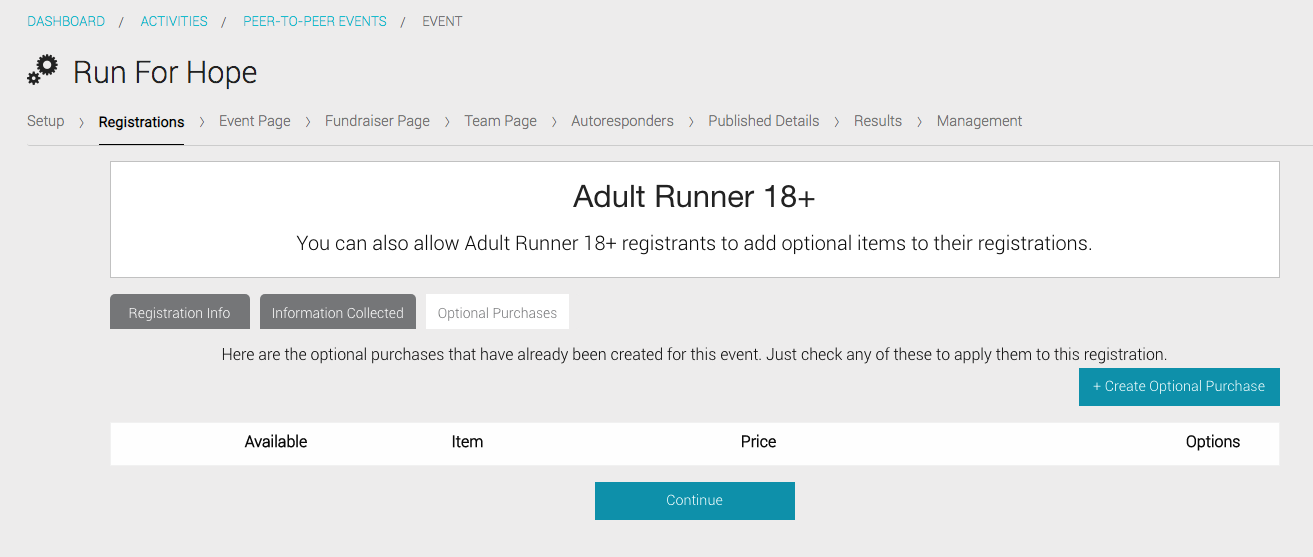
(C) Optional Purchases
Use the Optional Purchases tab to add merchandise or anything else you want to sell during your online event registration, like t-shirts or bracelets.
To add an item for optional purchase...
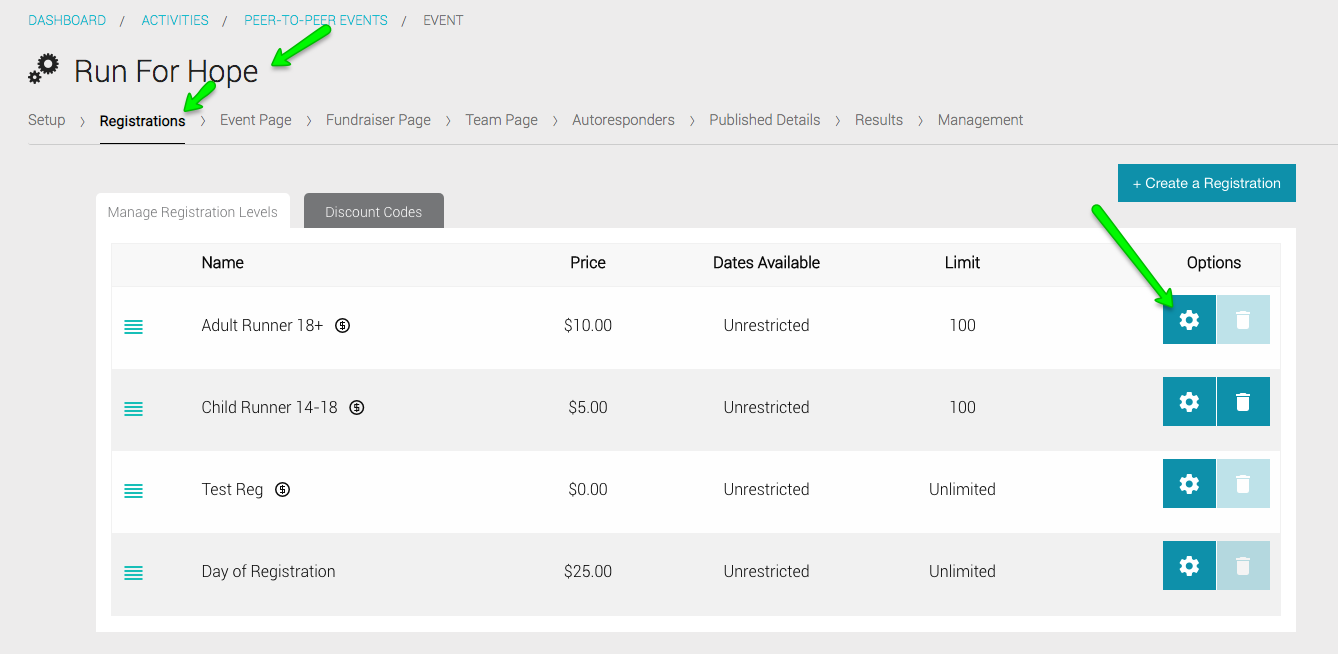
- On the P2P event's Registrations tab, select the Registration Level Options button (blue and white gear icon) for which you'd like to have an Optional Purchase available to your registrant.

- Click the Optional Purchases tab.
- Click the +Create Optional Purchase button.
- Enter the following Purchase Details information about the optional purchase (those with asterisks are required):
- Item Name *
- Item Description
- Price *
- Which registrations to Apply Optional Purchase To *
- Save your first optional purchase entry.
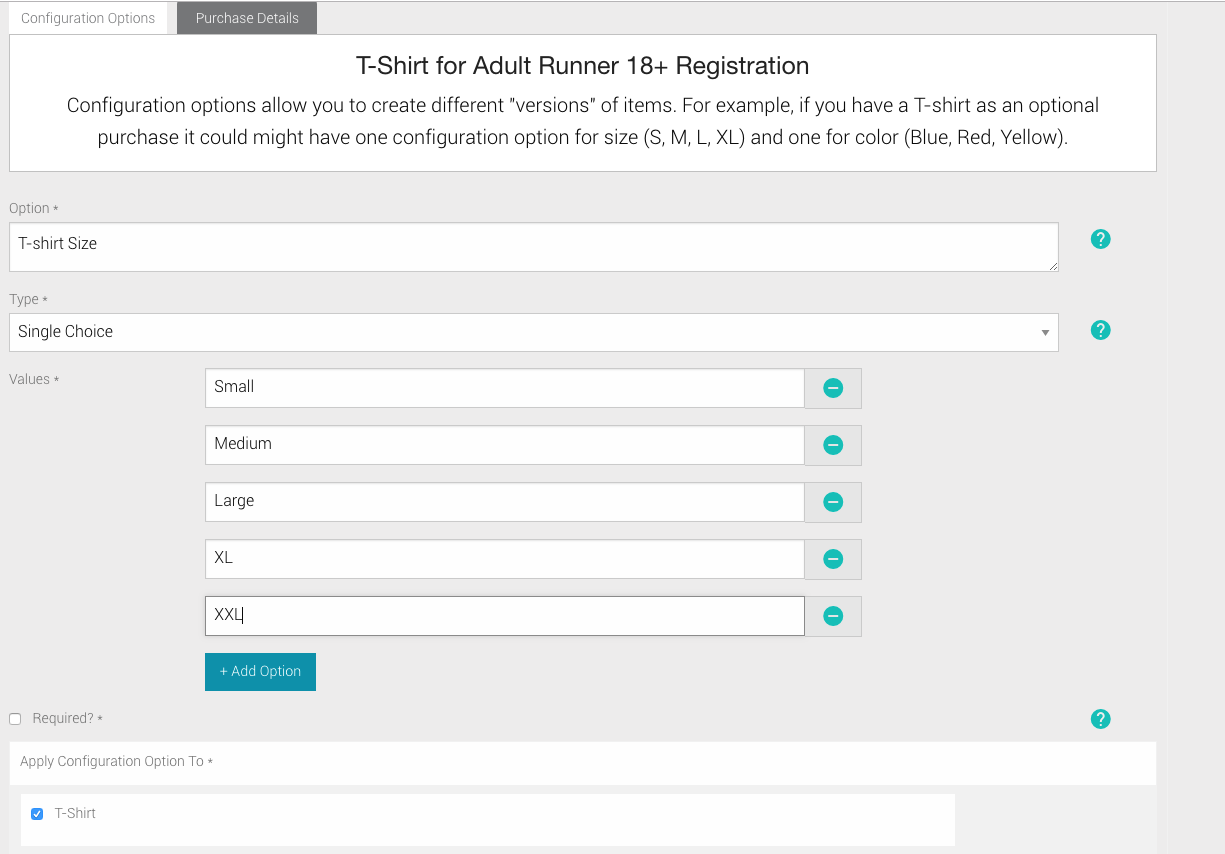
- After each optional purchase item, enter Configuration Options. These allow you to create different "versions" of items. For example, if you have a t-shirt as an optional purchase it might have one configuration option for size (S, M, L, XL) and one for color (Blue, Red, Yellow).
- Click +New Option to enter the item's configuration options.

- Configuration Option Types include...
- Yes/No
- Single Choice (Small, Medium, Large, XL, XXL, etc.)
- Text Box (registrant types their value in themselves).
- Check the Required? box if the Configuration Option is required.
- Click Save.
- Repeat entering Configuration Options if necessary.
- Click +New Option to enter the item's configuration options.
- When you've finished entering items, click the Continue button. The Manage Registrations window will open.
- Verify the list of items, and then click the Next» at the bottom of the window.
Step 3: Compose the Event Page
This step enables you to create content and page layout, manage the activity's page settings, consider what type of confirmation the supporter receives, select which payment gateway to use (if you have more than one payment gateway configured) and add any third-party tracking to your form. See the Compose page for additional information.
Pro Tip: The best way to learn what options are available for elements that are already on the form is to hover over any element you are interested in, click the pencil icon, and experiment with the various options.
Important Peer-to-Peer Elements
The Event Page includes several, unique Visual Editor elements:
-
Goal Tracker—This control is enabled on the Setup tab by 'Will this event have an event-level fundraising goal in addition to fundraiser/team goals?'. Drag and drop this control into the part of your Event, Fundraiser, and/or Team page where you want it to provide a graphical display of the progress that is being made toward the goal that you defined in Setup. If you did not enable the Goal Tracker on the Setup tab, you'll still be able to place the Goal Tracker on your form, but it will not show up in the published form. In this case, you can still use it internally to track statistics.
-
Fundraiser Login Button—Add this button to enable supporters to else you decide to put the login. Suggested layouts now contain two login shortcuts by default: one at the top right of the landing page and one at the bottom of the page.
-
Team Search—Optionally apply a team search button that enables visitors to search for a team by typing in a team name.
-
Fundraiser Search—Optionally apply a fundraiser search button that enables visitors to search for a team by typing in a fundraiser's name.
-
Leaderboard—Apply a Leaderboard to display Top Teams and Top Fundraisers' names, amounts raised, and profile pictures.
See the Visual Editor for Activities and Messaging documentation for detailed information about composing pages.
When the Landing Page looks the way you want it to, click the Registration link at the top of the page.
There are four parts/tabs that you'll have to configure for the Event Page tab:
- Event
- Registration
- Checkout
- Confirmation
Step 4: Compose the Registration Page
Now that the Event Form is done, you're on to the Registration Form tab. Click the Registration tab at the top of the page. The Registration form window will appear.
You can add content to the Registration Form but it's important to keep the focus on the Registration and not provide too much distraction for potential registrants. Preview the look and feel and then Save and click over to the Checkout Tab.
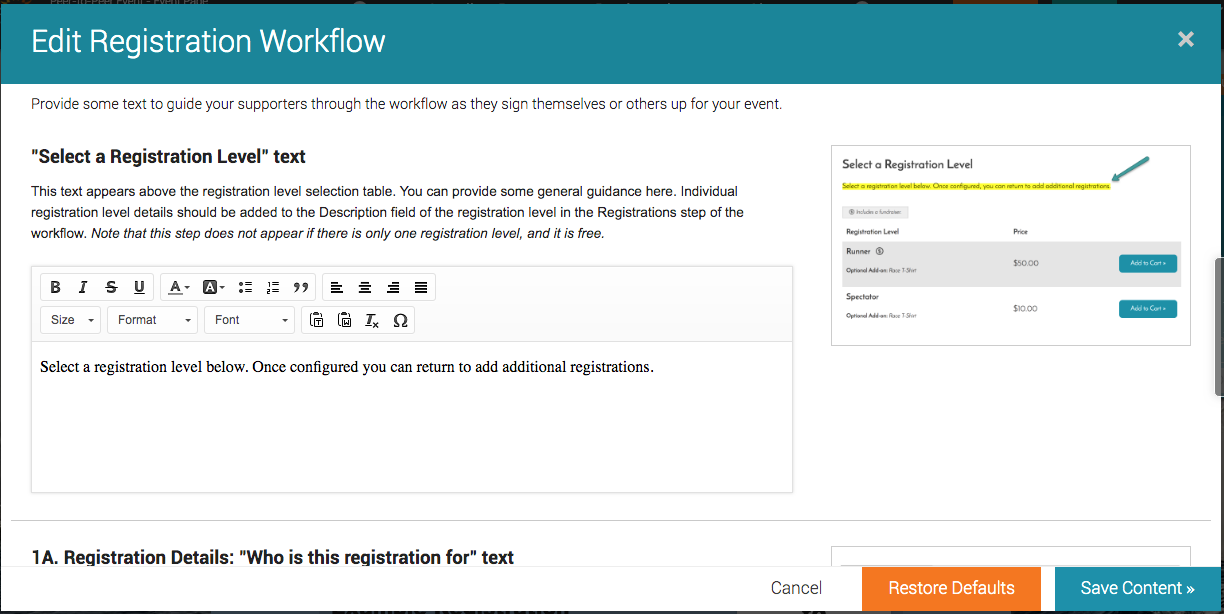
Edit Registration Workflow
Provide some editable text to guide your supporters through their Ticketed Events and Peer-to-Peer workflow as they sign themselves or others up for your events.

To edit workflow text for Peer-to-Peer Events...
- Click the Activities menu on the left.
- Click the P2P event you wish to edit.
- Click the Event Page tab at the top of the screen.
- In the Activity Content section, click the Edit Content button.
- Click the Registration page at the top of the screen.
- Double-click the Registration element.
"Select a Registration Level" Text
This text appears above the registration level selection table. You can provide some general guidance here. Individual registration level details should be added to the Description field of the registration level in the Registration step of the workflow. NOTE: This step does not appear if there is only one registration level, and it is free.
"Who Is This Registration For" Text
The answer to this question determines whether or not a supporter should be asked to create a fundraising page before checking out. Selecting "Me" will also prepopulate the supporter's information in the Checkout step. NOTE: This step does not appear if there is only one registration level, and it is free.
"Enter Your Information" Text
Add some guidance for your supporters about the demographic fields they are filling out for each registration.
Registration Details: "Additional Questions" Text
Provide a heading or some helpful text for the additional registration questions configured in the "Information Collected" section of each registration level. NOTE: This step does not appear if there are no additional questions configured.
Add-On Purchases Text
You may use this text area to provide some additional information about the items that are available for purchase. Individual item descriptions should be added in the "Optional Purchases" section of each registration level. NOTE: This step does not appear if there are no optional purchases configured.
"Create Your Fundraiser Account" text
Fundraising pages require an email and password for your supporters to manage their fundraising efforts. On this step, your supporters will be choosing whether to use Facebook to log into their fundraiser portal or, alternatively, creating a password specifically for this purpose. NOTE: This step does not appear for registration levels that do not include fundraising.
Fundraiser "Your Account" Text
In this area, your supporters will be providing an email address and password for their fundraiser portal. If they've chosen the Facebook login option, then this area will be populated with the email address used for their Facebook login, and it will be read-only. NOTE: This step does not appear for registration levels that do not include fundraising.
"About This Fundraiser" Text
You can use this text area to provide guidance for your supporters on setting up the name and goal of their fundraising page, joining or creating a team, and signing a waiver, when applicable. NOTE: This step does not appear for registration levels that do not include fundraising.
"Summary" Text
This step shows a summary of all of the registration information that a supporter has filled out, so far. From this step, they can edit or delete registrations, enter a discount code, if available, and then add another registration or move on to the checkout step.
When the form looks the way you want it to, click the Checkout link at the top of the page.
Step 5: Compose the Checkout Page
This is where registrants will see a summary of their purchase, enter their credit card information and potentially, make additional donations. This page should be as easy as possible to maximize conversions.
When the form looks the way you want it to, click the Confirmation View link at the top of the page.
Step 6: Compose Confirmation View Page
This is the page that your supporters will see when they have completed the process.
When the form looks the way you want it to...
- Click Exit to Exit the edit mode.
- Click Save and Exit to save your changes, or Cancel and Exit to exit without saving your most recent changes.
- Click the Next» button in the lower right.
Step 7: Compose the Fundraiser Page Template
After setting up the Event Page, you'll create the Fundraiser Page. This page has three parts: Landing Page, Checkout, and Confirmation View.
See the Visual Editor for Activities and Messaging documentation for detailed information about composing pages.
Step 8: Compose the Team Page Template
This page will be visible only if you chose 'Yes' for the 'Will this event allow teams?' option on the Setup page (documented above).
After setting up the Fundraiser Page, you'll create the Team Page. This page has three parts: Landing Page, Checkout, and Confirmation View.
See the Visual Editor for Activities and Messaging documentation for detailed information about composing pages.
Step 9: Set Up Autoresponders
You can choose whether or not to add an Autoresponder by selecting the appropriate radio button under the Autoresponders tab. Learn more about Autoresponders and how to configure them here.
Step 10: Published Details
This tab provides the same information as it does for other Engage Activities, but with additional URLs:
- The Event Page URL link will take you to your event page. You can use it on your website or elsewhere on the web to link to your event page.
- The Link straight to registration link enables potential supporters to skip the main P2P event landing page and go directly to the ticket selection screen. For example, if you have your own event page on your website, you can use this link instead of the Event Page URL link so that potential supporters are taken straight to the ticket section. This allows you to expedite the registration process and avoid repeating event details unnecessarily.
- The Fundraiser Page Template link enables you to preview your fundraiser page.
- The Team Page Template link enables you to preview your team page.

