This document is useful for the Salesforce and Engage subject matter experts and who will be setting up as well as maintaining the integration. This document...
- Describes the Salesforce versions compatible with the integration.
- Recommends how Engage admins initially set up the link between your Salesforce and Engage databases.
- Establishes the user permissions necessary to access the connected Salesforce account.
- Describes how Engage admins can install the custom Salesforce app installation that facilitates the integration.
- Defines certain automated and default aspects of the sync like contact owners, record types, potential duplicate contact matching rules, data mapping, and Salesforce contact exclusion processes.
Salesforce Requirements
Salsa Engage is Compatible with Professional, Enterprise, Unlimited, and Performance editions of Salesforce. Installation of the Nonprofit Success Pack is not required, but it is compatible. At this time, Salsa Engage does not support integration with RoundCorner.
Configuration Settings in Engage
Salsa Labs recommends an integration manager should become familiar with the documentation and perform the following steps before the initial synchronization of your Salesforce and Engage databases.
Connect Engage to Salesforce
This step establishes the permissions in Salesforce for the integration user to access the connected Salesforce account. This step does not automatically install the application in Salesforce that is needed for the integration to run, nor does it initiate the integration. This only allows Engage to reach out to the connected Salesforce account to view various settings, custom fields, etc., that is needed to configure the integration settings.
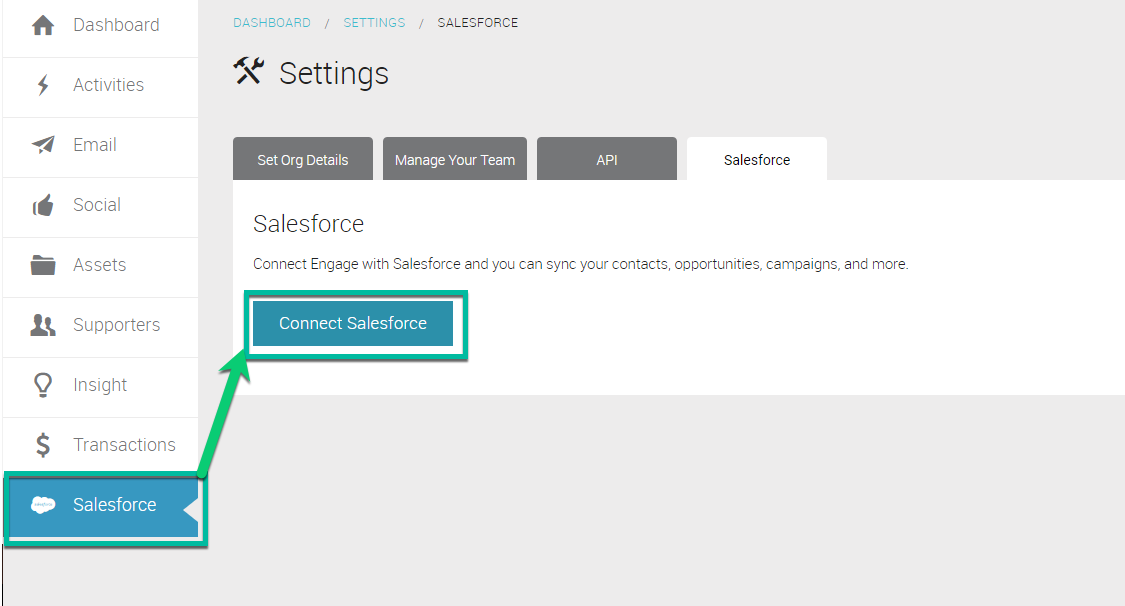
Navigate to the Salesforce menu to connect Salsa to the Salesforce account:
- Click the Salesforce menu on the left.
- Click the Connect Salesforce button on the Salesforce tab.
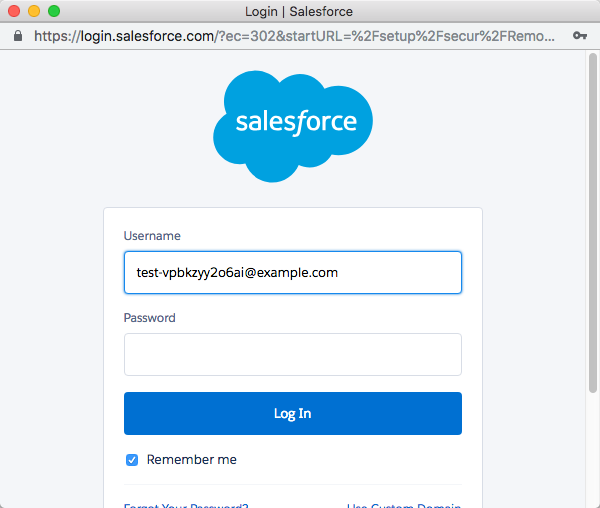
- Log in to your Salesforce.com database.
Install Salsa App in Salesforce
In order to connect Salsa Engage with Salesforce, the Engage admin needs to install a small app on the Salesforce side, which installs custom objects that are related to Contact records. Salsa Engage provides a link that, when clicked, installs the application in Salesforce, as seen below.
Matching New Supporters and Duplicate Matching
In order to create entries in Salesforce, the Engage admin must configure some settings to define the default contact owner and record type and set the potential duplicate contact matching rules.
Default Contact Owner
Salesforce requires every contact in the system to have an Owner. The integration defaults to the Salesforce user that was used to authorize the integration (above). However, that Salesforce user may not be the desired Contact Owner moving forward. An Engage admin can adjust this setting to use a different Salesforce user as default Contact Owner.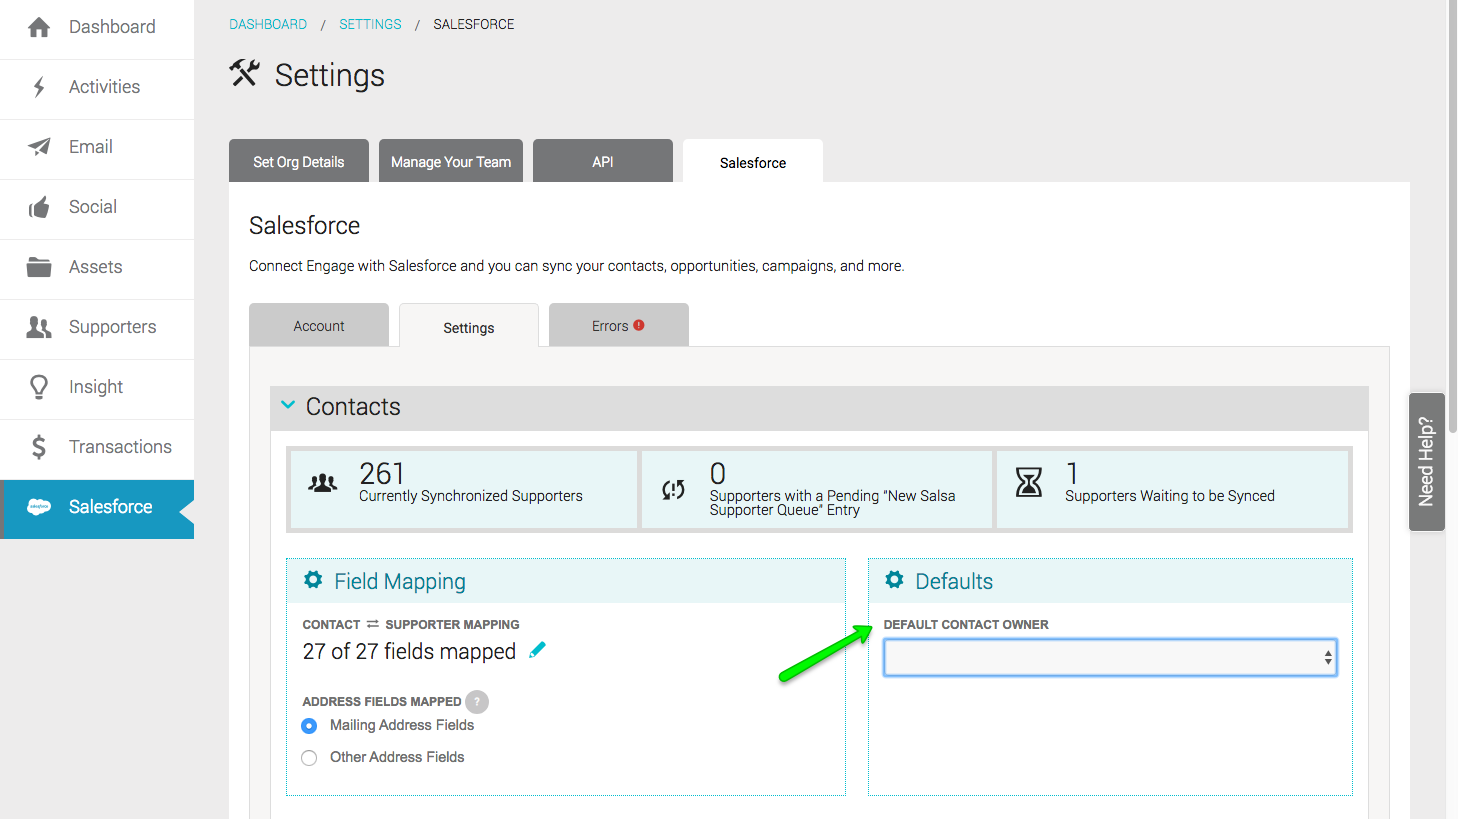
Default Contact Record Type (Optional)
Record types are available in Salesforce Enterprise, Performance, Unlimited, and Developer Editions and the user account that authenticates to Salesforce needs the 'Customize Application' permission to create or change record types.
If Contact Record Types are in use, then the integration Defaults section displays the option to set the Default Contact Record type for newly synced records. A list of available Contact Record Types can be found in Salesforce.
Duplicate Contact Matching
Engage provides different configuration options that determine how the integration handles new records that are sent to Salesforce. When a new supporter is created in Engage, the integration looks up potential matches in Salesforce using certain rules defined for the initial sync, as seen in the Field Mapping Options section below. These rules use Salesforce's native duplicate management tools to find potential matches. Read more about these options here. Setting up how the integration handles matches will impact both initial synchronizations as well as ongoing synchronizations. 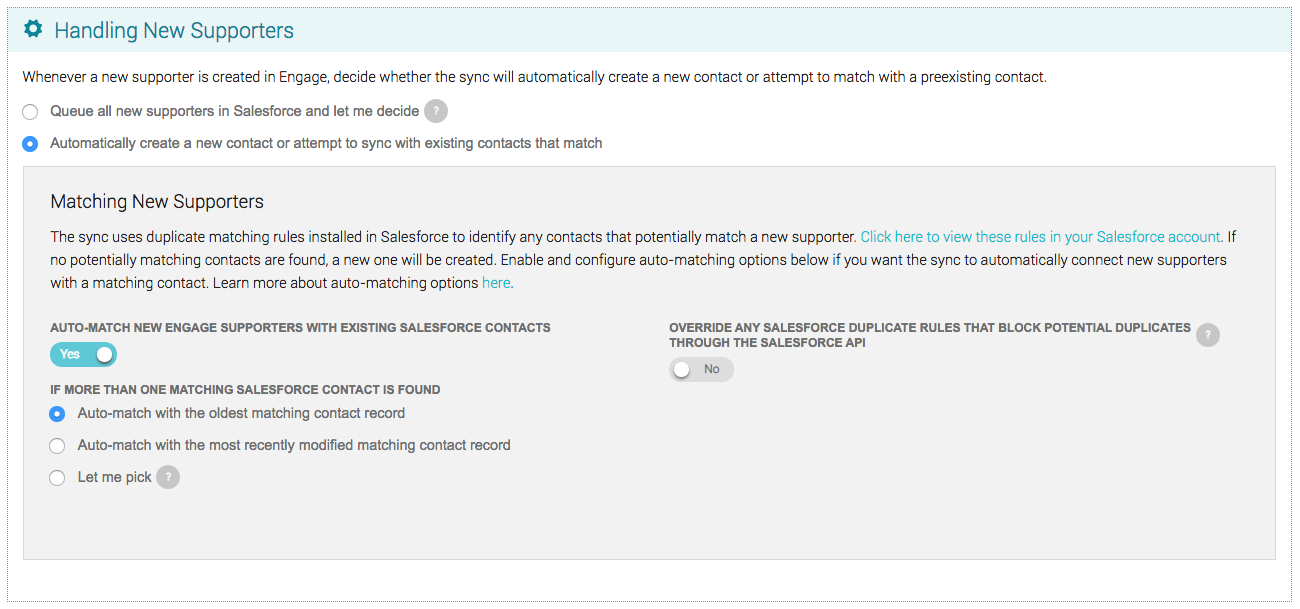
Contact Field Mapping
Engage supporters are your people with whom you engage in advocacy, fundraising, and emails. This section of the integration settings defines how the integration between Salesforce and Salsa Engage handles initial and ongoing updates between Salesforce contacts and Engage supporters. Separate definitions detail how data is handled when a new record initially syncs between the two systems as well as when an update occurs from either side.
To access the Field Mapping options...
- Click the Salesforce menu on the left.
- Click the Settings tab.
- Click the blue pencil in the Field Mapping section.
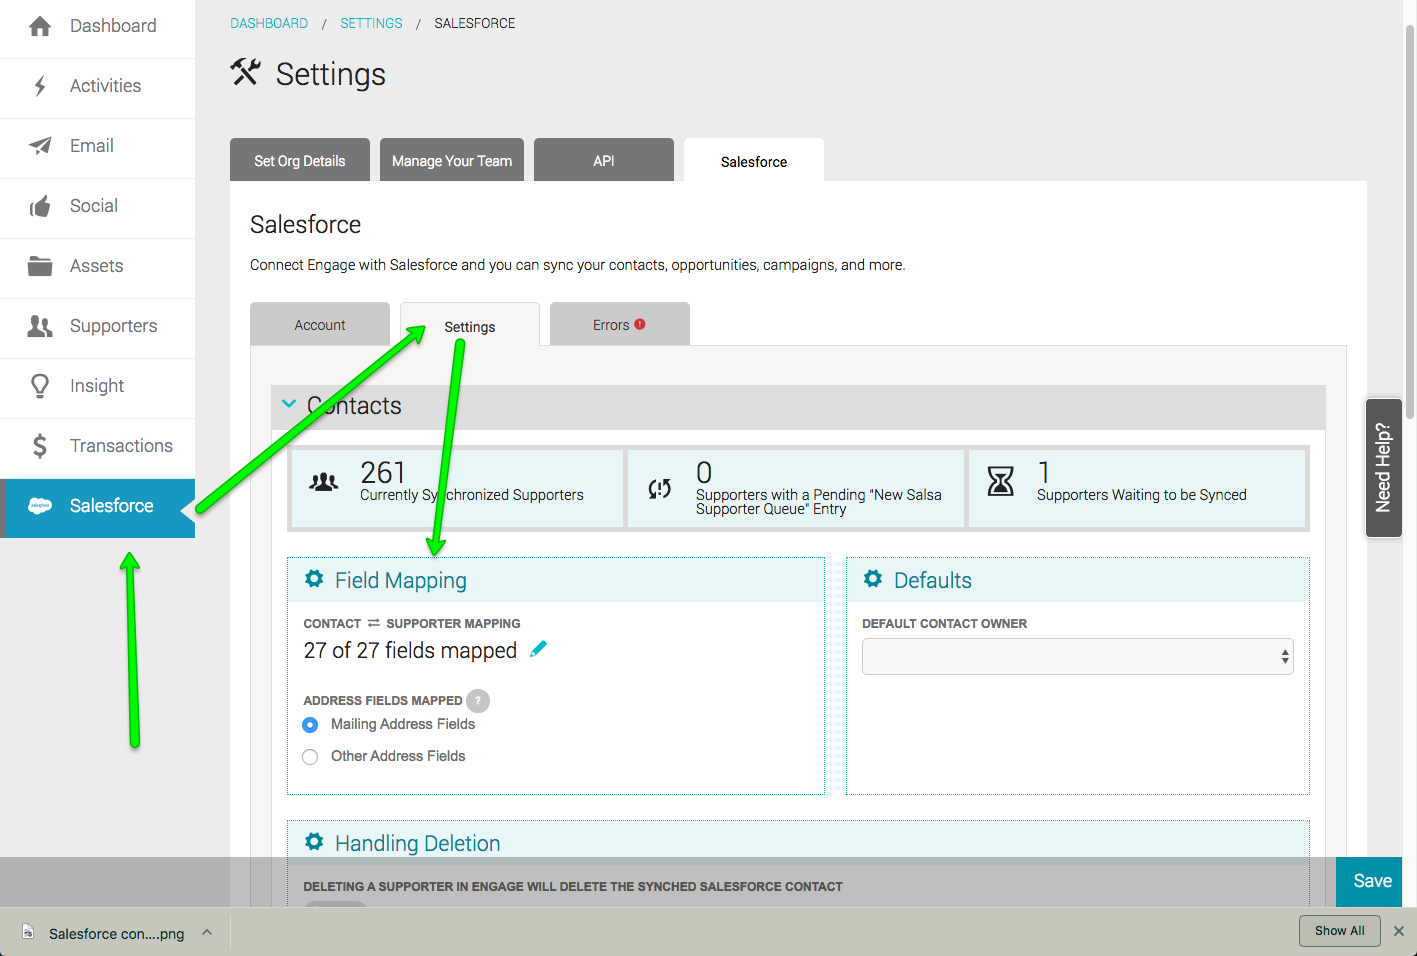
A separate setting within the Field Mapping area controls whether mailing address fields or other address fields in Salesforce sync to Engage. Optionally, states in the Engage address can be shared to Salesforce using the ISO-3166 standard two-letter abbreviation.

Field Mapping Options
The integration allows users to map standard and custom fields on the Contact record to Supporter fields in Engage. These options define how the integration handles updates of specific data points between Salesforce Contacts and Engage Supporters.
- Standard Fields - Standard fields map automatically once the integration is connected to the Salesforce account. However, initial and ongoing sync rules may need to be adjusted, to suit your business needs, on the Field Mapping screen.
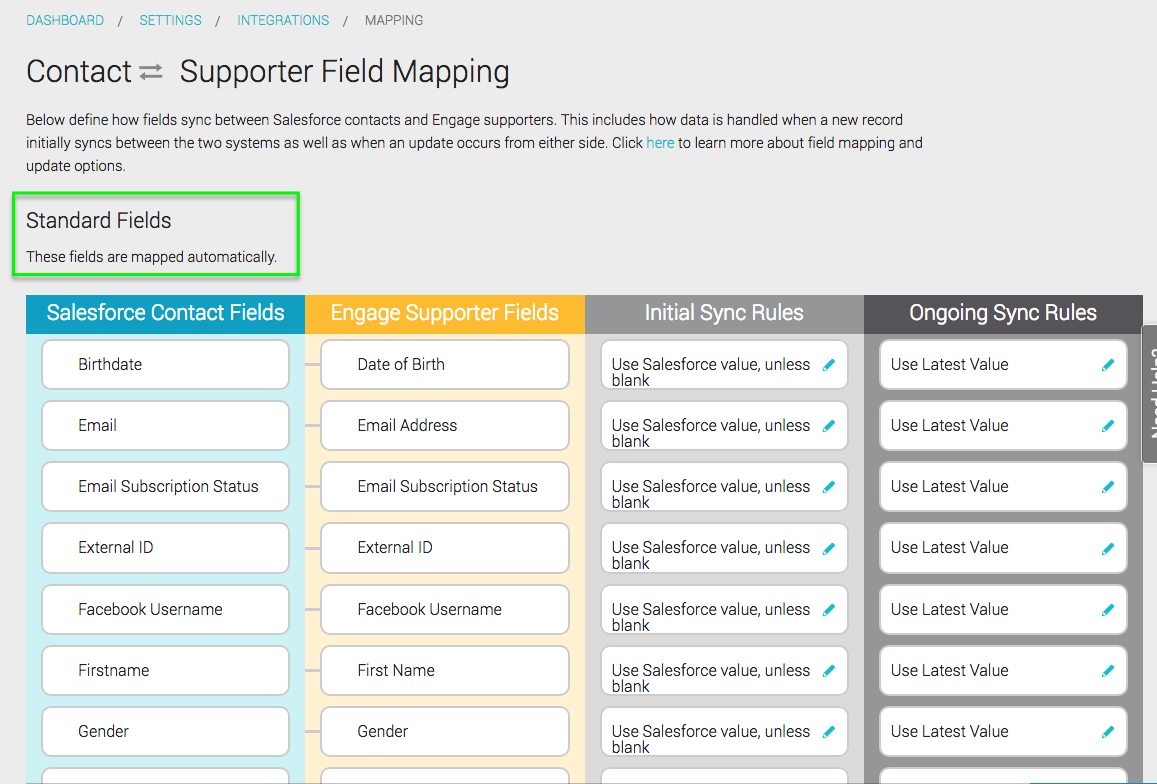
NOTE: Salesforce users should enable "MiddleName" and "Suffix" fields in the Salesforce User Interface settings if you have those data points in Engage. See this information below. - Custom Fields - There are potentially more custom field types that can be created in Salesforce than can be created in Engage. In addition, not all custom fields should be synced. All Salesforce Contact custom fields show up in the Mapping UI, but not all Engage fields need be mapped. This allows users to create Engage custom fields on the fly without auto-mapping and polluting Salesforce with extraneous, marketing-only data.

For important, in-depth information about Field Mapping Options, Standard Fields, and Custom Fields, please click here.
Opportunities
Opportunities in Salesforce are the sales that you want to track. They are analogous to successful monetary transactions in Salsa Engage. In order to create new Opportunities in Salesforce, Salsa must know how to store successful, refunded, and canceled donations. This is done by configuring the Opportunity Stage for successful, refunded, and canceled donations. To access the Opportunity Stage configuration options...
- Click the Salesforce menu on the left.
- Click the Settings tab.
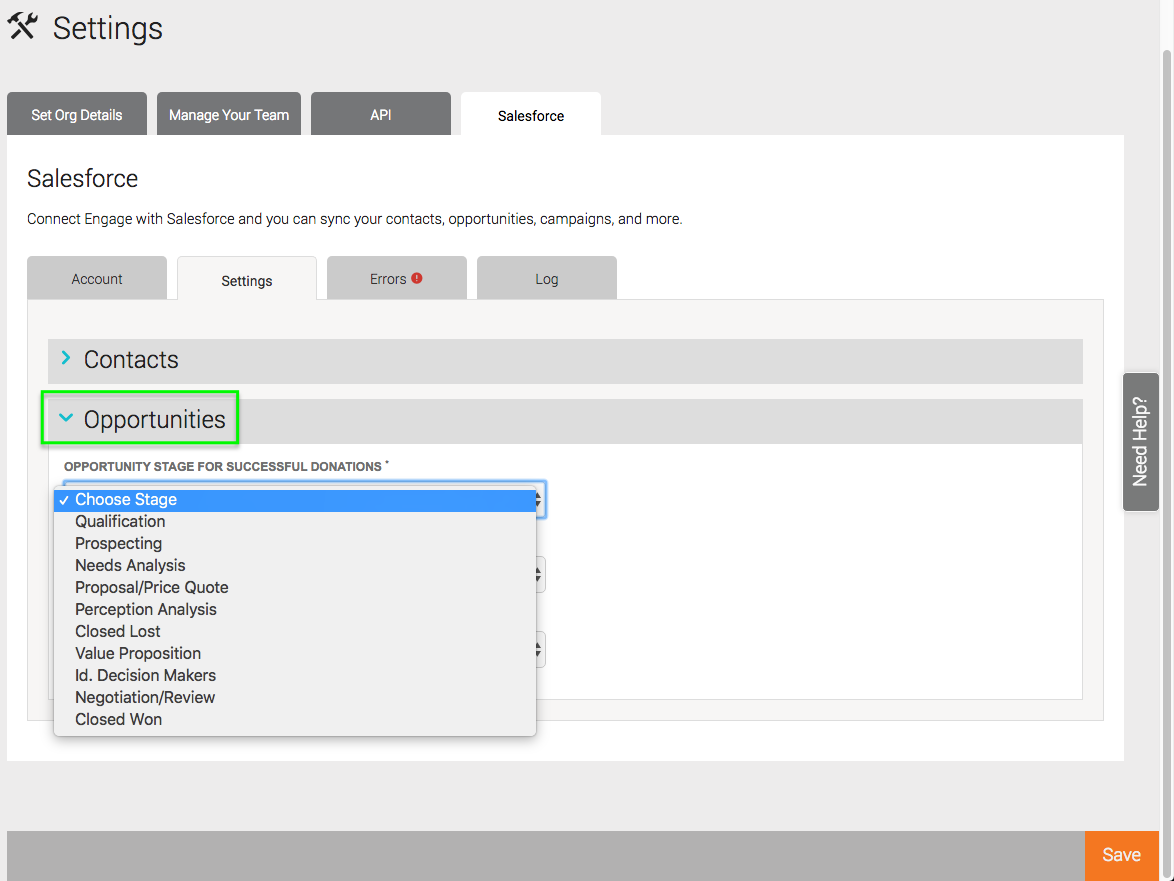
- Depending on what Stages are configured in the Salesforce account, some Opportunity Stage field adjustments may be necessary in Salesforce. Also, if record types are used, a default must be chosen in this section.
- Opportunity Stage for Successful Donations — Set the Stage field value for successful donations in Salesforce. Salsa Engage will use this value for opportunities created from successful donations.
- Opportunity Stage for Failed Donations — Set the Stage field value for failed donations in Salesforce. Salsa Engage will use this value for opportunities created that in turn are set to failure after the fact.
- Opportunity Stage for Refunded Donations — Set the Stage field value for refunded donations in Salesforce. Salsa Engage will use this value updating refunded opportunities.
- Default Opportunity Record Type (Optional) — If Opportunity Record Types are enabled in Salesforce, this option is visible and a default type may be set.
Opportunities and Nonprofit Success Pack
If your Salesforce account has Nonprofit Success Pack (NPSP) installed, there will be an additional option displayed to let NPSP set the Primary Contact Role and Account Name for any Opportunities created by the sync.
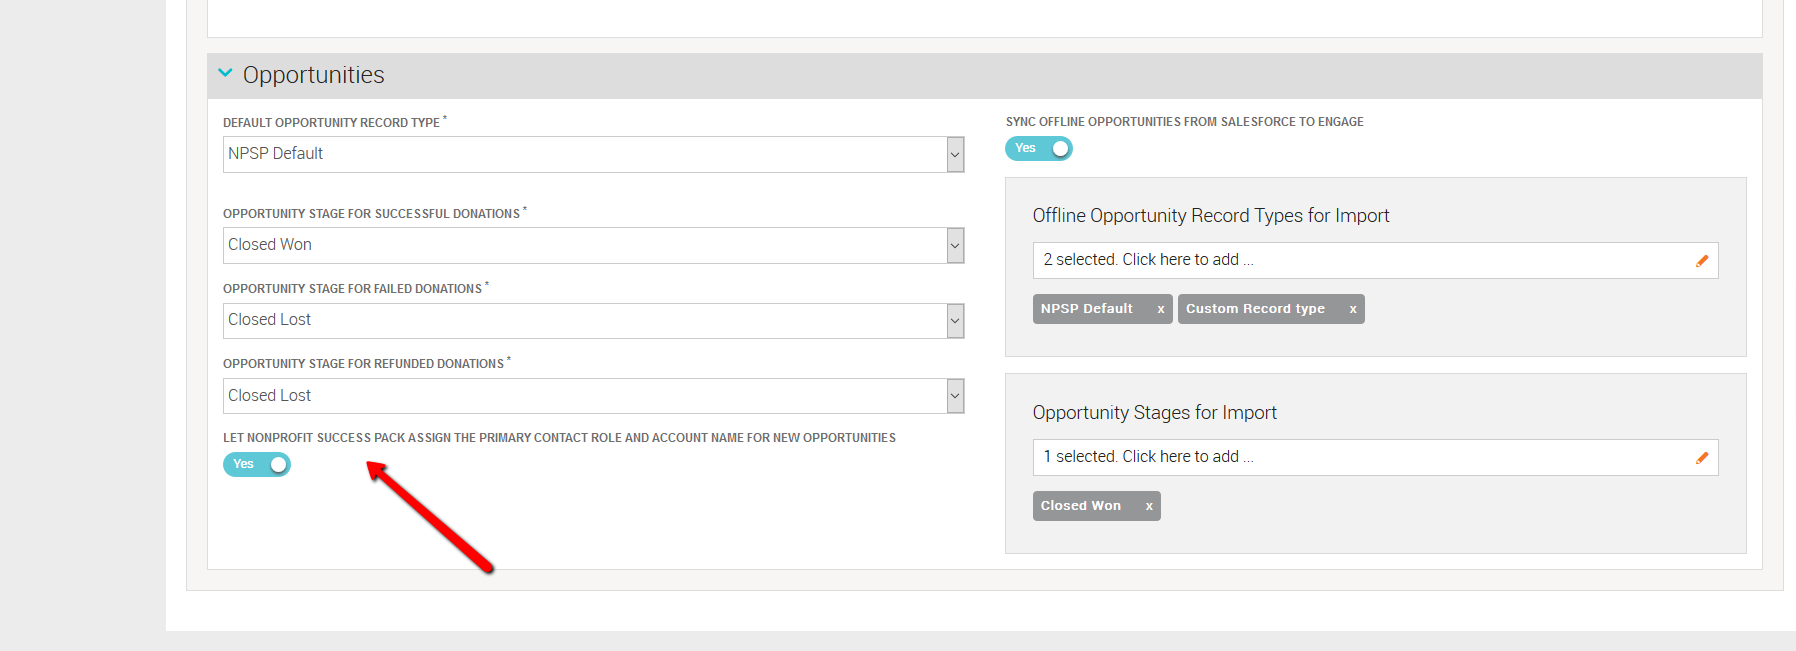
Enabling this feature allows the sync to store the Contact ID of a donor in NPSP’s Primary Contact custom field (npsp__Primary_Contact__c). NPSP then automatically assigns the Account Name and Primary Contact Role, based on the settings you have configured in Salesforce. We recommend enabling this feature.
Exclude Specific Contact Records in Salesforce From The Integration
If there is a subset of records that should NOT be synchronized with Salsa Engage, Salesforce contact records need to be configured with a Do Not Synchronize With Engage value. For example, if you have an organization that helps sexual assault victims and are tracked as Salesforce contacts as well as your donors, your clients should be excluded from Syncing with Salsa Engage.
If that subset of contacts is determined by a custom field value, contact record type, or another indicator that should be made into a rule, the integration manager should create a Salesforce workflow rule or process builder that will automatically set that checkbox to be checked if the precondition applies. A Salesforce workflow rule or process builder should auto-set the Do Not Synchronize With Engage field to be checked if a Contact is given that contact record type.
To set a specific contact in Salesforce to not synchronize with Engage...
- Click Contacts from the menu.
- Click the Details tab under the Contact record.
- Under the Salsa Engage Fields section, click the checkbox for Do Not Synchronize With Engage.
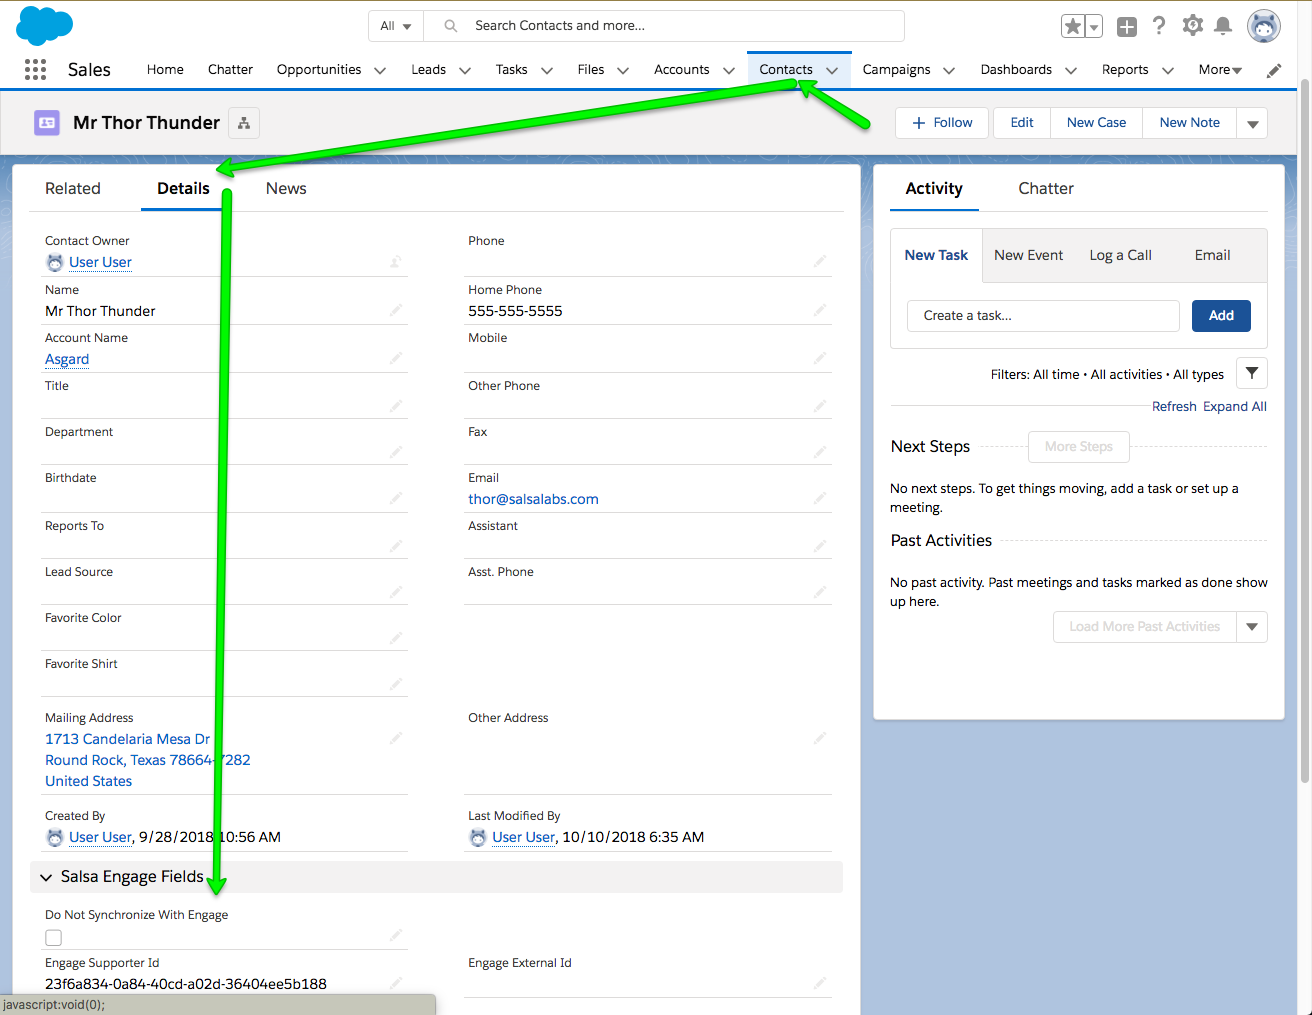
If a whole group of Contacts needs to be marked as Do Not Synchronize With Engage, checking each individually would take a long time. Moreover, if there's a particular record type that you always want to be marked that way, you might want to have that box checked automatically. Salesforce provides process workflows as a way to automate that process for marking many contacts as Do Not Synchronize With Engage.
Enable Salesforce Middle Name and Suffix Options (Optional)
Salesforce does not add Middle Name and Suffix fields to the contact name by default. However, Salsa supporter records have Middle Name and Suffix fields. You will need to decide how you want to handle these fields.
If you plan to sync these fields, you'll need to enable the Middle Name and Suffix fields in Salesforce. Your Salesforce administrator can enable this in your Salesforce account under Setup -> User Interface:
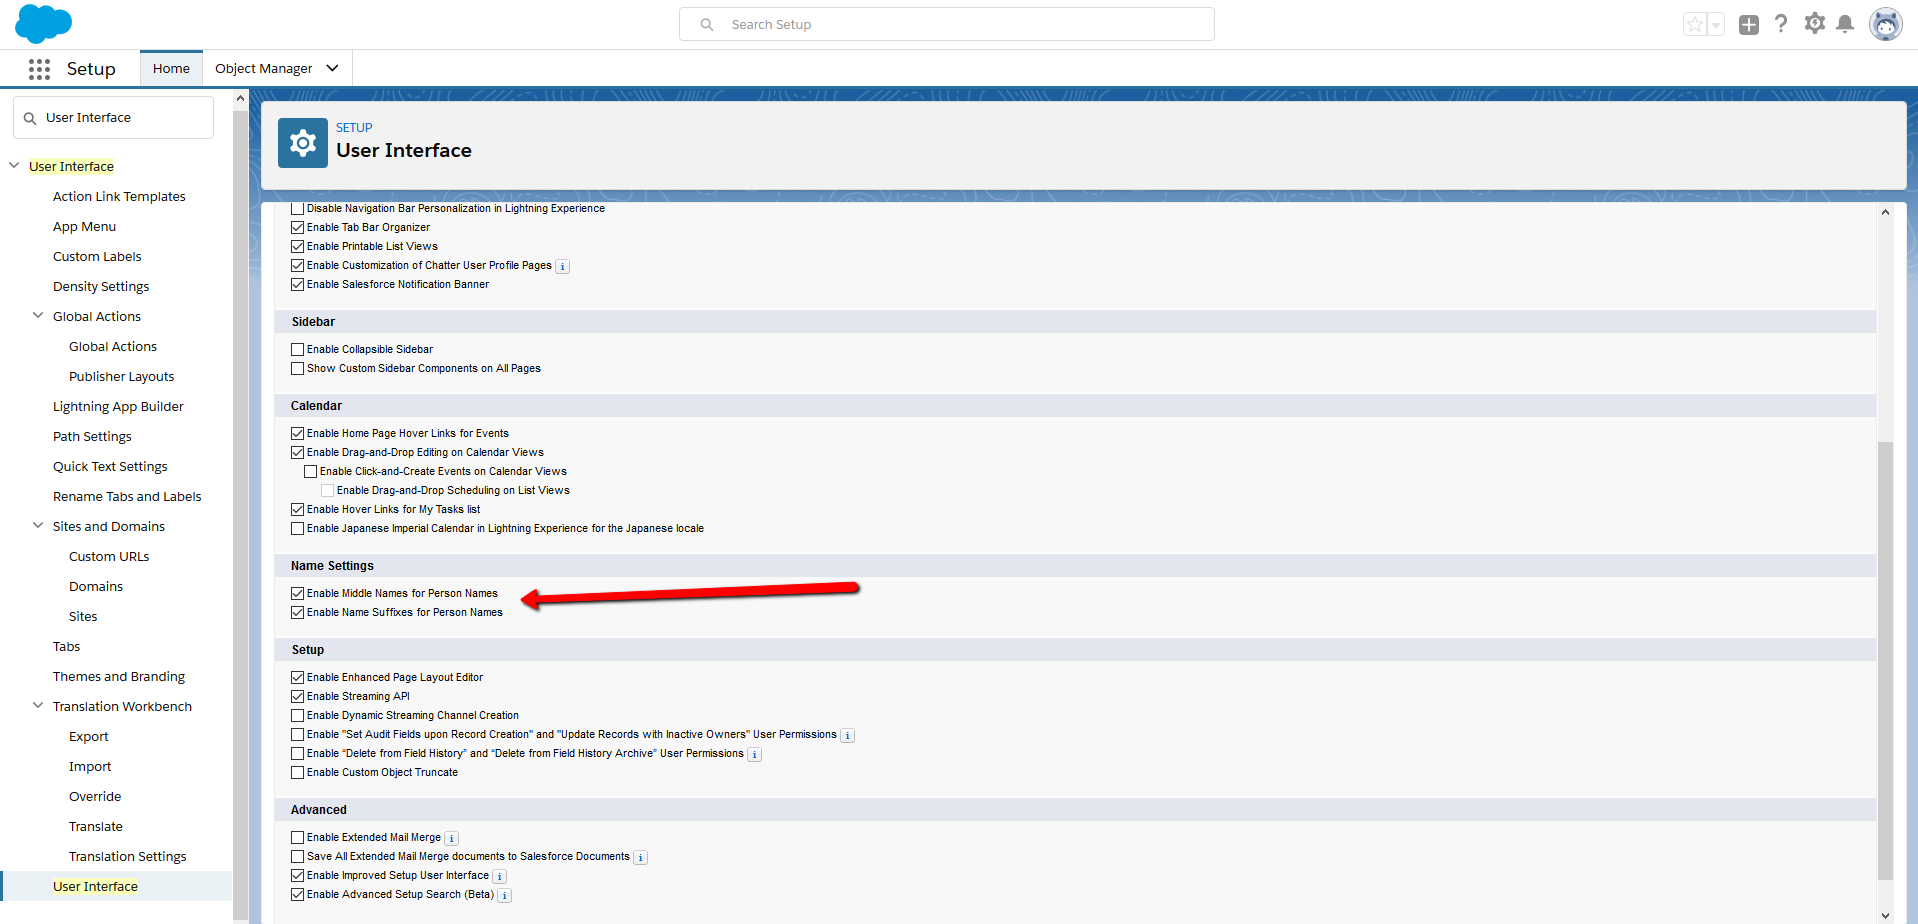
If you choose not to sync these fields, navigate to the Contact Field Mapping interface and set Middle Name and Sufifix to Disabled.
Initial Synchronization Scenarios
This section describes scenarios that might define your initial synchronization with Salesforce and the Engage integration settings that will produce the desired effect.
Scenario 1: No Engage Data, only Salesforce or Other Online Tool Data
In this scenario, the foundation has historically used Salesforce as their CRM and are looking to replace their online marketing tool with Engage.
Recommended Steps
- Configure Handling New Supporters and Matching New Supporters Options. These settings will apply only to new Engage supporters created after your sync since there’s no data in Engage.
- Press the Initial Synchronization button to do a one-time initial sync.
Post Initialization Steps
- Engage — Review any Errors in the Sync Log. Common errors may include Salesforce Contacts that could not be sent to Engage because a supporter already exists with the same email address. Manually merge these duplicates in Salesforce, or set the erroring Contacts to Do Not Sync to Salsa Engage.
- After the initial sync, turn on Scheduled Syncing to the desired sync frequency.
Scenario 2: No Data in Salesforce, Data Only in Engage
In this scenario, Salesforce is not populated with data. Perhaps another CRM is in use and the foundation is awaiting migration to Salesforce. In this scenario, Engage may be in use for a period of time, collecting data, and the Salesforce account is empty.
Recommended Steps
- Since there is no data in Salesforce...
- If you want to review ALL new contacts and any potential matches, set Handling New Supporters to No (no Contacts are created or matched with Engage supporters when they sync to Salesforce).
- If you want to automatically create new contacts, Set Handling New Supporters to Yes.
- Enable the integration to sync at the desired frequency. On the initial sync, Engage records are pushed to Salesforce.
Engage Post Initialization Steps
- Review any Errors in the Sync Log.
- Disable the integration when importing into Salesforce, then enable again once you're ready.
Scenario 3: Data in Salesforce and in Engage
In this scenario, both Salesforce and Engage are simultaneously in use. Data exists in both systems and needs to be equalized (making sure that information is up-to-date in both systems within the confines of the integration rules).
Recommended Steps
- Configure Matching New Supporters and Handling New Supporters Options according to business rules.
- If you want to prevent any contacts from coming into Engage and manually merge or create new Contacts in Salesforce...
- Set the Do Not Synchronize with Engage flag on all Contacts in Salesforce before sync. In this case, no records from Salesforce will come into Engage. All Supporters are staged in the Salsa New Supporter Queue.
- Manually merge each queue entry with existing Contacts or create them as new Contacts.
- Uncheck the Do Not Synchronize with Engage flag in Salesforce for the resulting records to be pulled into Engage.
- If you want to review ALL new contacts and any potential matches, set Handling New Supporters to No (no Contacts are created or matched with Engage supporters when they sync to Salesforce).
- If you want to automatically create new contacts with no potential matches but you manually determine ALL matches...
- Set Handling New Supporters to Yes.
- Set Matching New Supporters to No.
- If you want to automatically create new contacts and automatically match any potential matches if there's only one match...
- set Handling New Supporters to Yes.
- Matching New Supporters to Yes.
- set the Matching New Supporters rule to Let me Pick.
- If you want to automatically create new contacts and automatically match any potential matches even if there's more than one match...
-
- Set Handling New Supporters to Yes.
- Set Matching New Supporters to Yes.
- Set the Matching New Supporters rule to Use Oldest or Use Last Modified.
-
- If you want to prevent any contacts from coming into Engage and manually merge or create new Contacts in Salesforce...
- Enable the integration to sync at the desired frequency.
- On the initial sync, Engage records are sent to Salesforce. Salesforce contacts will, in turn, be pushed to Engage. Because data exists in both systems there is the potential for a lot of overlap. Depending on the Matching New Supporters and Handling New Supporters settings, it may be necessary to work through the Salsa New Supporter Queue to resolve all queue entries.
Post Initialization Steps
Depending on the Matching New Supporters and Handling New Supporters rules chosen, the following may become necessary:
- Salesforce — Review the Salsa New Supporter Queue for any records that were sent from Engage, that did not automatically match or get automatically created. Decide in that queue to create a new contact or merge with an existing record.
- Engage — Review any Errors in the Sync Log. Common errors may include the following:
- Engage records that could not be sent to Salesforce because of data problems (i.e., no Last Name, which is required). Resolve these manually in Engage and manually resync the record.
- Salesforce Contacts that could not be sent to Engage because a supporter already exists with the same email address. Manually merge these duplicates in Salesforce, or set the erroring Contacts to Do Not Sync to Salsa Engage.
